Quantcast
Channel: NZHistory, New Zealand history online - maps
Viewing all 41 articles
Browse latest View live

Map of Cassino area, 1944

$
0
0

This map depicts the layout of the Cassino area as it appeared when the New Zealand Corps attacked the Italian town in February and March 1944. The New Zealand Corps arrived at the town from the east. Its objective was the Liri Valley, the entrance to which is at the lower left corner of the map. 

The Benedictine monastery towering above the town on Monte Cassino was destroyed by aerial bombardment on 15 February because it was assumed that the Germans were using the site as a lookout. At midnight on 17 February members of the 28th (Māori) Battalion crossed the Rapido River from the east. They briefly captured the railway station but reinforcements were unable to cross the destroyed rail causeway and the Maori were forced to retreat back across the Rapido under heavy enemy fire.

After the aerial bombardment of the town and a delay caused by poor weather, the Corps launched a renewed attack on Cassino from the north on 15 March. The Indian and the New Zealand Divisions of the Corps attacked side by side: the Indians captured Castle Hill and the New Zealanders entered the northern part of the town. The attack was costly due to the determined German resistance, particularly around the Hotel Continental, and the difficulty of bringing armoured and artillery support through the ruined streets. With the New Zealand Division’s casualties nearing a thousand, the attack was called off on 23 March.

Cassino finally fell to the Allies in May 1944. Most of the German defenders withdrew after being outflanked, and the town and the ruins of the monastery were occupied by British and Polish troops.

Credit:

From McGibbon, Ian (ed) The Oxford Companion to New Zealand Military History (2000)

Map of the Cassino area, where New Zealand troops fought February-March 1944.

Media file

The 1913 strike in Auckland

$
0
0

Watersiders working on Auckland’s coal boats struck on 28 October in support of the Huntly miners. The rest of the city’s watersiders came out the next day following the failure of negotiations in Wellington.

The Farmers’ Union began enrolling men from rural areas around Auckland as special constables, while foot specials were enrolled in the city. Mayor C.J. Parr and a group of businessmen formed a defence committee. Its goals included forcing strikers to register under the arbitration act and destroying the United Federation of Labour and the Industrial Workers of the World (IWW).

The strikers’ media

Mainstream newspapers such as the Dominion and the New Zealand Herald were strongly opposed to the Red Feds and the strike. The strikers, however, had their own media. The Maoriland Worker, a national weekly with a distribution of about 10,000, was the UFL’s official paper. The IWW considered the Worker too conservative and produced their own militant paper, the Industrial Unionist. The most widely distributed pro-strike paper was New Zealand Truth, at that time a muck-raking left-wing paper with a distribution of about 40,000.

Auckland was a major centre for union militants, in particular members of the IWW (the ‘Wobblies’). Nevertheless, there was little violence in the city during the strike.

Special constables began assembling at a camp on the Domain around 6 November. In the early hours of the 8th mounted and foot specials, along with regular police, descended on the wharves. They caught the strikers by surprise and took the wharves without a struggle.

In response, a general strike broke out across Auckland, involving at least 6000 workers. Unions striking included the seamen, tramwaymen, carpenters, plumbers, bricklayers, drivers, timber workers, building labourers, saddlers and bakers. Both Red Fed and arbitrationist unions took part. The strikers held firm for a fortnight before most of the unions started drifting back to work. The watersiders, seamen, drivers and tramwaymen remained on strike, but by this time a ‘scab’ (arbitrationist) union was working on the wharves.

Watersiders in Auckland began to strike in support of those in Huntly and Wellington.

Media file

Gallipoli places map

$
0
0

The map below locates places of significance to New Zealand forces during the Gallipoli campaign, April-December 1915. Click on a place name below the map to find its location then zoom in for a more detailed view. Select the Satellite, Terrain, or Map options for a different perspective. View this map in 3-D on Google Earth (KMZ file).

This map below locates places of significance to New Zealand forces during the Gallipoli campaign.

Media file

Pike River coalfield map

$
0
0

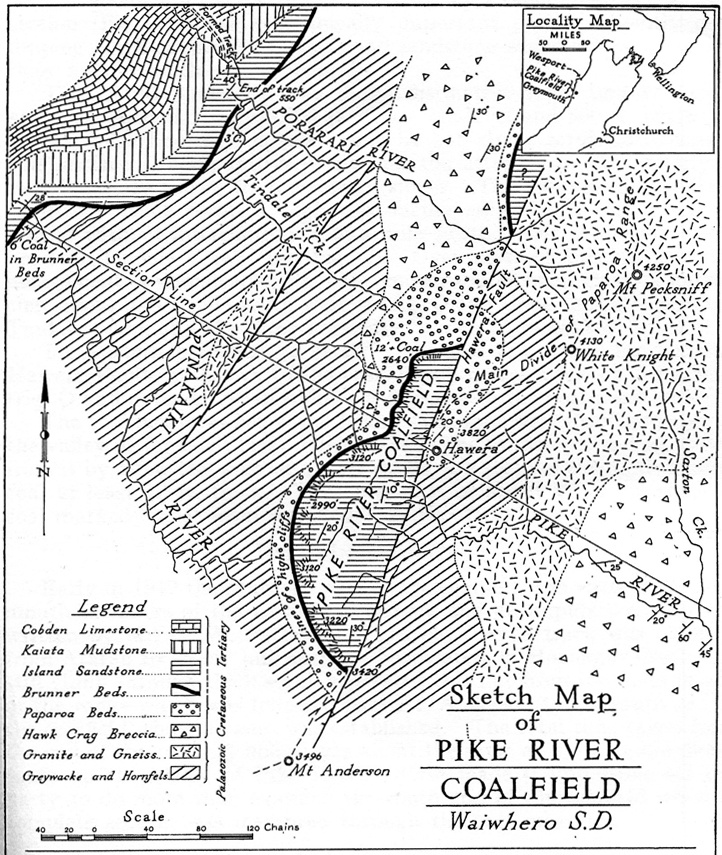
First geological map of the Pike River coalfield, produced by Harold Wellman in 1948. The Brunner coal seam, mined by the Pike River coal company, is within the solid black line which shows the location of the Brunner beds.

Credit: 

NZ Journal of Science & Technology B30(2), 1948, p. 85

First geological map of the Pike River coalfield, produced by Harold Wellman in 1948

Media file

Pike River mine location map

$
0
0

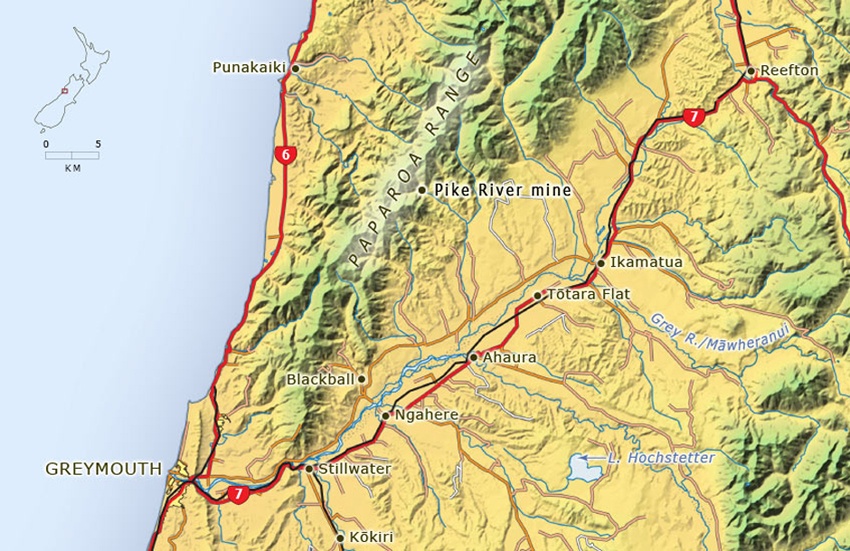
The Pike River underground coal mine is located high in the rugged Paparoa Range, on the West Coast of the South Island. On 19 November 2010, the mine exploded. Twenty-nine men underground died immediately from the blast, or shortly afterwards because of the toxic atmosphere this generated. Two men who were in the tunnel, some distance from the mine workings, managed to escape.

Credit: 
Media file

Deaths from underground gas explosions in mines

$
0
0

This map shows the location of New Zealand's major coal mine disasters where deaths were caused by methane gas explosions.

Another major disaster, where 11 were killed at Glen Afton mine, Huntly, on 24 September 1939, was caused by fire. More recently, four men were killed by fire caused by spontaneous combustion at the New Imperial (Boatmans No. 4) coal mine, Reefton, on 18 September 1985.

Credit: 

NZHistory

Information from the Report of the Royal Commission on the Pike River Coal Mine Tragedy Vol.2 (2010) pp258-261

BY-SA

This map shows the location of New Zealand's major coal mine disasters where deaths were caused by gas explosions.

Media file

Test interactive

Christchurch recruiting map, 1916

$
0
0

The Christchurch Recruiting Committee conducted a ‘house to house canvass’ of every household in the city in the winter of 1916, encouraging men to volunteer and recording the names of the willing. The map shows the Committee’s progress as at 31 May 1916, with the town broken into numbered blocks for the canvassers. 

Credit: 

Archives New Zealand 
Reference:  AAYS 8698 AD82 box 5 12/4
Permission of Archives New Zealand Te Rua Mahara o te Kāwanatanga must be obtained before any re-use of this material.

Map showing which houses had been visited by the Christchurch Recruiting Committee

Media file

Map and orders for NZ Division's Somme offensive

$
0
0

Page one of Order No. 20 (Secret) issued to New Zealand troops in France just before they became involved in the Battle of the Somme. The Order issued on 14 September 1916 includes a map of the British front line from High Wood to Ginchy dated 10 September.

The Order contains a detailed outline of the New Zealand Division’s tasks and objectives for the following day. The division reached its objectives but the anticipated ‘decisive victory’ was not achieved.

Archives New Zealand
Reference: ACID 24945 

Permission of Archives New Zealand Te Rua Mahara o te Kāwanatanga must be obtained before any re-use of this material.

Media Group: 
NZ history: 

Order and map of planned offensive on the Somme, 15 September 1916

Media file

Armistice and occupation of Germany map

$
0
0

You can also download a hi-res copy as a pdf (2.5 mbs).

This map shows the areas from which the German army was forced to withdraw during the late stages of the First World War and following the Armistice of 11 November 1918.

Between July and November 1918 the Allies pushed the overstretched and demoralised German army eastward across the area on the map shaded red. By the time an armistice came into effect at 11 a.m. on 11 November (at which point the front line extended along the purple line above), most of northern France and part of Belgium had been liberated from German occupation.

The conditions of the Armistice gave Germany 14 days to evacuate from all remaining occupied territory and German territory claimed by France and Belgium (the grey-shaded area), and 28 days to withdraw its armed forces across the river Rhine (to the right of the map).

The Allies insisted on sending their armies to occupy the demilitarised Rhineland and establishing 30-km bridgeheads centred on Cologne, Coblenz and Mainz. This was to ensure that Germany would not break the Armistice’s ceasefire before the terms of peace could be agreed to. The Allied forces’ respective occupation zones are highlighted in yellow on the map.

When news of the Armistice was received on 11 November, most of the New Zealand Division was billeted at Beauvois and Fontaine (marked by the number 1 on the map). On 28 November they began their march towards the British occupation zone around the industrial city of Cologne (their route is shown by the red arrow). On 19 December, after a 240-km march, the New Zealand Division entered German territory. The infantry then boarded trains and arrived in Cologne next day, followed on Boxing Day by the artillery units.

From late December, New Zealand soldiers who had volunteered in 1914-15 and those who were married were sent back to England and from there to New Zealand. When it became clear that Germany was not capable of resuming combat, the repatriation process sped up. On 25 March 1919 the last draft of New Zealand soldiers left Cologne.

Credit: 

Map produced by Geographx with research assistance from Damien Fenton and Caroline Lord.

It originally appeared in Damien Fenton, New Zealand and the First World War (Penguin, 2013)

BY-SA

Map showing area evacuated by Germany after 1918 Armistice and German zones occupied by Allies

Media file

Schlieffen Plan and German invasion of 1914

$
0
0

You can also download a hi-res copy as a pdf (4 mbs).

The Schlieffen Plan drawn up in 1905 was the German army’s answer to its central strategic problem: how to win a war on two fronts, against France in the west and Russia in the east. The Chief of the Imperial German General Staff, Count Alfred von Schlieffen, envisaged a massive attack through the Low Countries into northern France (shown by the green arrows on the map), an advance that would persuade France to surrender within six weeks. Troops could then be sent east by rail to defend East Prussia against the ‘Russian steamroller’, which was expected to be slow to get moving.

Schlieffen’s plan was executed by his successor Helmuth von Moltke in August 1914, with some modifications. The Netherlands was not invaded; more troops than planned were kept in Alsace-Lorraine to defend it against a French offensive; and 250,000 troops were diverted to East Prussia to help fend off an unexpectedly speedy Russian advance.

The broken purple line shows the furthest extent of the 1914 German advance. Their offensive ended in mid-September with a French victory in the First Battle of the Marne. The subsequent German retreat to the positions indicated by the solid purple line ended any hopes of a quick victory against the French. Instead, the Western Front settled into a stalemate that was to last 3½ years. The front line was in much the same position when the New Zealand Division arrived in April 1916. The area shaded green is the foreign territory that was occupied by Germany for most of the war.

Historians disagree about whether the reduction of the invading force’s numbers was the key reason the Schlieffen Plan failed. Among other factors, Belgian resistance was stronger and the British Expeditionary Force was in the field sooner than the Germans expected.

Credit: 

Map produced by Geographx with research assistance from Damien Fenton and Caroline Lord.

It originally appeared in Damien Fenton, New Zealand and the First World War (Penguin, 2013)

BY-SA

Map showing the 1905 Schlieffen Plan and actual German advances of 1914

Media file

Gallipoli places map

$
0
0

The map below locates places of significance to New Zealand forces during the Gallipoli campaign, April-December 1915. Click on a place name below the map to find its location then zoom in for a more detailed view. Select the Satellite, Terrain, or Map options for a different perspective. View this map in 3-D on Google Earth (KMZ file).

This map below locates places of significance to New Zealand forces during the Gallipoli campaign.

Media file

Map of Cassino area, 1944

$
0
0

This map depicts the layout of the Cassino area as it appeared when the New Zealand Corps attacked the Italian town in February and March 1944. The New Zealand Corps arrived at the town from the east. Its objective was the Liri Valley, the entrance to which is at the lower left corner of the map. 

The Benedictine monastery towering above the town on Monte Cassino was destroyed by aerial bombardment on 15 February because it was assumed that the Germans were using the site as a lookout. At midnight on 17 February members of the 28th (Māori) Battalion crossed the Rapido River from the east. They briefly captured the railway station but reinforcements were unable to cross the destroyed rail causeway and the Maori were forced to retreat back across the Rapido under heavy enemy fire.

After the aerial bombardment of the town and a delay caused by poor weather, the Corps launched a renewed attack on Cassino from the north on 15 March. The Indian and the New Zealand Divisions of the Corps attacked side by side: the Indians captured Castle Hill and the New Zealanders entered the northern part of the town. The attack was costly due to the determined German resistance, particularly around the Hotel Continental, and the difficulty of bringing armoured and artillery support through the ruined streets. With the New Zealand Division’s casualties nearing a thousand, the attack was called off on 23 March.

Cassino finally fell to the Allies in May 1944. Most of the German defenders withdrew after being outflanked, and the town and the ruins of the monastery were occupied by British and Polish troops.

Credit: 

From McGibbon, Ian (ed) The Oxford Companion to New Zealand Military History (2000)

Map of the Cassino area, where New Zealand troops fought February-March 1944.

Media file

Pike River coalfield map

$
0
0

First geological map of the Pike River coalfield, produced by Harold Wellman in 1948. The Brunner coal seam, mined by the Pike River coal company, is within the solid black line which shows the location of the Brunner beds.

Credit: 

NZ Journal of Science & Technology B30(2), 1948, p. 85

First geological map of the Pike River coalfield, produced by Harold Wellman in 1948

Media file

Pike River mine location map

$
0
0

The Pike River underground coal mine is located high in the rugged Paparoa Range, on the West Coast of the South Island. On 19 November 2010, the mine exploded. Twenty-nine men underground died immediately from the blast, or shortly afterwards because of the toxic atmosphere this generated. Two men who were in the tunnel, some distance from the mine workings, managed to escape.

Credit: 
Media file

Deaths from underground gas explosions in mines

$
0
0

This map shows the location of New Zealand's major coal mine disasters where deaths were caused by methane gas explosions.

Another major disaster, where 11 were killed at Glen Afton mine, Huntly, on 24 September 1939, was caused by fire. More recently, four men were killed by fire caused by spontaneous combustion at the New Imperial (Boatmans No. 4) coal mine, Reefton, on 18 September 1985.

Credit: 

NZHistory

Information from the Report of the Royal Commission on the Pike River Coal Mine Tragedy Vol.2 (2010) pp258-261

BY-SA

This map shows the location of New Zealand's major coal mine disasters where deaths were caused by gas explosions.

Media file

Test interactive

Christchurch recruiting map, 1916

$
0
0

The Christchurch Recruiting Committee conducted a ‘house to house canvass’ of every household in the city in the winter of 1916, encouraging men to volunteer and recording the names of the willing. The map shows the Committee’s progress as at 31 May 1916, with the town broken into numbered blocks for the canvassers. 

Credit: 

Archives New Zealand 
Reference:  AAYS 8698 AD82 box 5 12/4
Permission of Archives New Zealand Te Rua Mahara o te Kāwanatanga must be obtained before any re-use of this material.

Map showing which houses had been visited by the Christchurch Recruiting Committee

Media file

Map and orders for NZ Division's Somme offensive

$
0
0

Page one of Order No. 20 (Secret) issued to New Zealand troops in France just before they became involved in the Battle of the Somme. The Order issued on 14 September 1916 includes a map of the British front line from High Wood to Ginchy dated 10 September.

The Order contains a detailed outline of the New Zealand Division’s tasks and objectives for the following day. The division reached its objectives but the anticipated ‘decisive victory’ was not achieved.

Archives New Zealand
Reference: ACID 24945 

Permission of Archives New Zealand Te Rua Mahara o te Kāwanatanga must be obtained before any re-use of this material.

Media Group: 
NZ history: 

Order and map of planned offensive on the Somme, 15 September 1916

Media file

NZEF in England 1916-19 map

$
0
0

You can also download a hi-res copy as a pdf (1.3 mbs).

In order to support the New Zealand Expeditionary Force (NZEF) on the European continent, an enormous infrastructure of camps, hospitals, depots and offices was developed across the Channel, in England. Their locations are indicated by the white boxes on the map above.

The NZEF Headquarters in London dealt with records, public enquiries, postal matters, soldiers’ pay and legal issues.

Initially, Sling Camp on Salisbury Plain was the only training camp for New Zealand servicemen in England. This soon began to overflow, so secondary camps were established to accommodate other units: the New Zealand Rifle Brigade (NZRB) trained at Brocton; the New Zealand Machine Gun Corps (NZMGC) was based at Grantham; the artillery units (NZFA) and the Medical Corps (NZMC) both trained at Ewshot; the signallers were based at Stevenage; and the engineers, tunnellers and Māori reinforcements trained at Christchurch in Dorset.

New Zealand's sick and wounded soldiers were ferried from France to England on hospital ships. In the latter part of 1916 the NZEF set up a number of general hospitals to care for them: the first was at Brockenhurst, the second at Walton-on-Thames and the third, at Codford, looked after men from Sling Camp.

Complementing these general hospitals were convalescent hospitals, to which patients were sent to recover before returning to service. New Zealand soldiers recovering from wounds or diseases suffered at Gallipoli in 1915 were sent to the Anzac Convalescent Depot in Weymouth. From 1916, NZEF enlisted soldiers were sent to the large New Zealand Convalescent Hospital at Hornchurch, while two convalescent homes in Brighton were reserved for officers and nurses. Codford housed the New Zealand Command Depot, which provided rehabilitative training to soldiers not yet fit enough to return to their unit. Men deemed unfit for further service waited at the New Zealand Discharge Depot in Torquay for transport back to New Zealand.

Credit: 

Map produced by Geographx with research assistance from Damien Fenton and Caroline Lord.

It originally appeared in Damien Fenton, New Zealand and the First World War (Penguin, Auckland, 2013).

BY-SA

Map showing the main New Zealand Expeditionary Force camps and areas of activity in England during the First World War

Media file
Viewing all 41 articles
Browse latest View live