Quantcast
Channel: NZHistory, New Zealand history online - maps
Viewing all 41 articles
Browse latest View live

Map of the Russian Empire in 1914


Map of New Zealand in 1914

Map of Australia in 1914

Map of Canada in 1914

Map of British India in 1914

Map of Newfoundland in 1914

Map of South Africa in 1914

New Zealand disasters map


First World War map

$
0
0

This map locates events mentioned in the First World War timeline. The pin colours represent different periods: blue-1914-15; purple-1916; red-1917 and green-1918-19.

Map showing some of the key locations that impacted on New Zealand's First World War

Media file

Rock music festivals map 1970-2010

$
0
0


View NZ Music Festivals in a larger map, including index. You can also view this map in Google Earth (right click on link and save to your computer to launch).

This map shows the location of most rock music festivals held in New Zealand between 1970-2010. Please email us at info@nzhistory.net.nz or leave a communnity contribution below this if you think we have missed something, or you are able to supply more accurate geo-location information.

Google Maps

Media Group: 

Google map showing location of forty years of NZ rock music festivals

Media file

The Salonika front, 1915-1918

$
0
0

See enlarged version of this image

Map of the Salonika front, 1915–1918.

After withdrawing from Serbia in November 1915, Allied forces took up defensive positions around Salonika, assuming that Bulgarian forces would try and advance into Greece. The expected invasion never took place. Instead, the Bulgarians dug in along the Greek-Serb border from the coast of Albania to Lake Doiran and the Bulgarian border.

In 1916, Allied troops in Salonika advanced against the Bulgarian defensive line. The British Salonika Force (BSF) took up positions at Doiran and advanced into the Struma Valley to the east, driving out Bulgarian forces during September. The French, supported by Russian, Italian and later Serbian troops, captured the strategic town of Monastir in November 1916.

In April 1917, the Allies launched a major offensive. The main thrust was made by French and Serbian forces to the west, with the British launching a diversionary attack at Doiran. Both these attacks failed, and the campaign settled down to stalemate until September 1918, when Serbian forces broke through the Bulgarian lines. Bulgarian resistance quickly crumbled and on 30 September an armistice came into effect.

Credit:

Alan Wakefield and Simon Moody, Under the devil's eye: Britain's forgotten army at Salonika 1915-1918, 2004

Map of the Salonika front, 1915-1918.

Media file

Map showing Cook's voyages

$
0
0


This map from 1800 shows the routes taken by Captain James Cook when he visited New Zealand in 1769–70, 1773 and 1777. The main image shows a detail; click on thumbnail to see the full map.

Credit:

Alexander Turnbull Library
Reference: A new map of the world, published by Laurie & Whittle, 1800

Permission of the Alexander Turnbull Library, National Library of New Zealand, Te Puna Matauranga o Aotearoa must be obtained before any reuse of this image.

Map from 1800 which shows the routes taken by Captain James Cook when he visited New Zealand in 1769-70, 1773 and 1777

Media file

Battles of Broodseinde and Passchendaele map

$
0
0

See enlarged version of this map here. You can also download a hi-res copy as a pdf (1.5 mbs).

The New Zealand Division won a comprehensive victory and then suffered its single costliest assault in two successive battles in early October 1917.

In late August 1917 General Herbert Plumer was given command of an offensive to capture high ground east of the Belgian town of Ypres using his Second Army (positioned south of the red broken line on the map). Under the command of the Army’s II ANZAC Corps was the New Zealand Division (just above the centre of the map).

The New Zealand Division took part in the Battle of Broodseinde on 4 October 1917, tasked with seizing part of the Broodseinde Ridge called Gravenstafel Spur. On that day the New Zealand soldiers overwhelmed German forward positions, captured 1100 prisoners and helped to extend the front line eastwards, as indicated by the thick purple broken line. This was achieved at a cost of 1700 casualties, including 350 deaths.

The British high command mistakenly concluded that the relative ease with which the Broodseinde Ridge had been won meant enemy resistance was faltering. It resolved to make a further push for Passchendaele Ridge on 12 October. However, by this time heavy rain had turned the terrain of Flanders into a muddy bog, rendering artillery support ineffective.

New Zealand soldiers advanced up the ridge only to find the enemy’s concrete pillboxes and lines of barbed wire still largely intact. 845 New Zealanders lost their lives in the Battle of Passchendaele, and another 2700 were wounded. This futile attack was the New Zealand Division’s greatest disaster.

The survivors of the New Zealand Division were withdrawn over the following weeks and replaced by members of the Canadian Corps. At a cost of 16,000 casualties, the Canadians managed to capture Passchendaele Ridge on 10 November, extending the front line to the thin purple broken line on the map.

Credit:

Map produced by Geographx with research assistance from Damien Fenton and Caroline Lord.

It originally appeared in Damien Fenton, New Zealand and the First World War (Penguin, 2013)

BY-NC

Map showing progression of front line on Western Front following Battles of Broodseinde and Passchendaele, 1917

Media file

Armistice and occupation of Germany map

$
0
0

See enlarged version of this map here. You can also download a hi-res copy as a pdf (2.5 mbs).

This map shows the areas from which the German army was forced to withdraw during the late stages of the First World War and following the Armistice of 11 November 1918.

Between July and November 1918 the Allies pushed the overstretched and demoralised German army eastward across the area on the map shaded red. By the time an armistice came into effect at 11 a.m. on 11 November (at which point the front line extended along the purple line above), most of northern France and part of Belgium had been liberated from German occupation.

The conditions of the Armistice gave Germany 14 days to evacuate from all remaining occupied territory and German territory claimed by France and Belgium (the grey-shaded area), and 28 days to withdraw its armed forces across the river Rhine (to the right of the map).

The Allies insisted on sending their armies to occupy the demilitarised Rhineland and establishing 30-km bridgeheads centred on Cologne, Coblenz and Mainz. This was to ensure that Germany would not break the Armistice’s ceasefire before the terms of peace could be agreed to. The Allied forces’ respective occupation zones are highlighted in yellow on the map.

When news of the Armistice was received on 11 November, most of the New Zealand Division was billeted at Beauvois and Fontaine (marked by the number 1 on the map). On 28 November they began their march towards the British occupation zone around the industrial city of Cologne (their route is shown by the red arrow). On 19 December, after a 240-km march, the New Zealand Division entered German territory. The infantry then boarded trains and arrived in Cologne next day, followed on Boxing Day by the artillery units.

From late December, New Zealand soldiers who had volunteered in 1914-15 and those who were married were sent back to England and from there to New Zealand. When it became clear that Germany was not capable of resuming combat, the repatriation process sped up. On 25 March 1919 the last draft of New Zealand soldiers left Cologne.

Credit:

Map produced by Geographx with research assistance from Damien Fenton and Caroline Lord.

It originally appeared in Damien Fenton, New Zealand and the First World War (Penguin, 2013)

BY-NC

Map showing area evacuated by Germany after 1918 Armistice and German zones occupied by Allies

Media file

Schlieffen Plan and German invasion of 1914

$
0
0

See enlarged version of this map here. You can also download a hi-res copy as a pdf (4 mbs).

The Schlieffen Plan drawn up in 1905 was the German army’s answer to its central strategic problem: how to win a war on two fronts, against France in the west and Russia in the east. The Chief of the Imperial German General Staff, Count Alfred von Schlieffen, envisaged a massive attack through the Low Countries into northern France (shown by the green arrows on the map), an advance that would persuade France to surrender within six weeks. Troops could then be sent east by rail to defend East Prussia against the ‘Russian steamroller’, which was expected to be slow to get moving.

Schlieffen’s plan was executed by his successor Helmuth von Moltke in August 1914, with some modifications. The Netherlands was not invaded; more troops than planned were kept in Alsace-Lorraine to defend it against a French offensive; and 250,000 troops were diverted to East Prussia to help fend off an unexpectedly speedy Russian advance.

The broken purple line shows the furthest extent of the 1914 German advance. Their offensive ended in mid-September with a French victory in the First Battle of the Marne. The subsequent German retreat to the positions indicated by the solid purple line ended any hopes of a quick victory against the French. Instead, the Western Front settled into a stalemate that was to last nearly four years. The area shaded green is the foreign territory that was occupied by Germany for most of the war.

Historians disagree about whether the reduction of the invading force’s numbers was the key reason the Schlieffen Plan failed. Among other factors, Belgian resistance was stronger and the British Expeditionary Force was in the field sooner than the Germans expected.

Credit:

Map produced by Geographx with research assistance from Damien Fenton and Caroline Lord.

It originally appeared in Damien Fenton, New Zealand and the First World War (Penguin, 2013)

BY-NC

Map showing the 1905 Schlieffen Plan and actual German advances of 1914

Media file

Sinai campaign 1916 map

$
0
0

See enlarged version of this map here. You can also download a hi-res copy as a pdf (2 mbs).

While most of New Zealand’s military units were transferred to the Western Front in early 1916 after withdrawing from Gallipoli, the 1800-strong New Zealand Mounted Rifles Brigade joined the Egyptian Expeditionary Force (EEF) in the Sinai campaign. The goal was to prevent Ottoman attacks on the Suez Canal, a vital transport link between Britain and its empire.

The EEF’s commander, Lieutenant-General Archibald Murray, argued that the canal could best be defended by going on the offensive and seizing control of the Sinai Peninsula from the Ottoman Turks. He proposed building a railway and water pipeline (the black dotted line on the map above) from the canal eastwards to a forward staging base at El Arish. This engineering feat, begun in April 1916, would facilitate the transportation of forces required for a campaign against the Ottomans, and provide necessary supplies in the arid desert environment.

The only major battle of the Sinai Campaign occurred in early August 1916 near the oasis town of Romani, where a 16,000-strong force from the Ottoman Fourth Army attempted to destroy the advancing railhead. The failed attack is depicted by the broken green line. British aerial reconnaissance and effective defensive preparations proved decisive in winning the battle, and from then on the EEF advanced across the desert without further serious opposition.

El Arish was abandoned by its Ottoman defenders in December 1916, and from there the Anzac Mounted Division and the Imperial Camel Corps Brigade launched an audacious and successful attack on the garrison at El Magdhaba. Following this defeat the Ottomans withdrew from all remaining outposts on the Sinai Peninsula except Rafa on the Sinai-Palestine border. After a day of fierce fighting on 9 January 1917 Rafa was captured, and the entire Sinai Peninsula was in the hands of the EEF.

Credit:

Map produced by Geographx with research assistance from Damien Fenton and Caroline Lord.

It originally appeared in Damien Fenton, New Zealand and the First World War (Penguin, Auckland, 2013)

BY-NC

Map showing troop movements and battle sites during Sinai campaign of 1916-17

Media file

Palestine campaign 1917-18 map

$
0
0

See enlarged version of this map here. You can also download a hi-res copy as a pdf (2 mbs).

The British government, encouraged by the success of the Sinai Campaign, urged its Egyptian Expeditionary Force (EEF) to continue the fight against the Ottoman Empire by invading Palestine. The 1800 men of the New Zealand Mounted Rifles Brigade (NZMR) served in the EEF during what became known as the Palestine Campaign.

Victory in the Third Battle of Gaza in October-November 1917 initiated the advance northwards and opened the way for the capture of southern Palestine. The red arrow labelled 1 on the map above shows the advance of the NZMR Brigade at this time, while the arrow labelled 2 shows its advance between December 1917 and February 1918. The purple lines show the front line on 30 October 1917 and 21 March 1918.

The transfer of many experienced units to the Western Front to counter a massive German offensive in late March meant that the EEF was unable to undertake any significant action in Palestine for the next six months. During this time the NZMR Brigade was stationed in the Jordan Valley, helping to protect the EEF’s right flank. In late March the Brigade took part in an unsuccessful raid on El Salt and Amman. This, and a second failed raid on Es Salt in April, are indicated by the broken red arrows.

With reinforcements from the Indian Army, the EEF was able to launch a major assault against the Ottomans in the Battle of Megiddo in September-October 1918 (indicated by the red arrow labelled 4). With the Ottoman armies defeated and in retreat, the Anzac Mounted Division crossed the River Jordan and captured Amman (indicated by the red arrow labelled 5). This offensive was aided by an Arab rebel army, which sabotaged the Hejaz Railway and advanced into Syria in September-October 1918. Following the Battle of Megiddo, Palestine, Jordan and southern Syria were rapidly conquered by the EEF and its allies, effectively bringing to an end the war in the Middle East.

Credit:

Map produced by Geographx with research assistance from Damien Fenton and Caroline Lord.

It originally appeared in Damien Fenton, New Zealand and the First World War (Penguin, Auckland, 2013)

BY-NC

Map showing military movements and battle sites in the Palestine campaign of 1917-18

Media file

The Western Front 1916-1917 map

$
0
0

See enlarged version of this map here. You can also download a hi-res copy as a pdf (2 mbs).

This map shows the northern part of the Western Front in 1916 and 1917, as well as some of the major battles that took place there in these years.

After the initial German invasion and retreat of 1914, the two opposing forces had settled into a network of trenches and defensive systems that stretched from English Channel to the Swiss border. By the time the New Zealand Division was transferred to the Western Front in April 1916, the front line ran along the solid purple line on the map above. The shaded areas represent foreign territory occupied by Germany.

The battles on the Western Front in this period were some of the deadliest in modern history. Both attackers and defenders suffered huge casualties from quick-firing artillery, modern machine guns and rifles, and miles of barbed-wire defences. After gaining some experience in this environment on a ‘quiet’ sector around Armentières, the New Zealand Division took part in the nightmarish Battle of the Somme in September 1916.

Facing manpower shortages and pressure on the Eastern Front, the German army withdrew from the Noyon Salient in March-April 1917 to prepared positions along the strongly defended Hindenburg Line, part of which is indicated above by the broken purple line.

A detachment of New Zealand pioneers and the New Zealand Tunnelling Company took part in the operations at Arras in April-May 1917. After recovering from the Battle of the Somme, and bolstered by new recruits, the New Zealand Division was heavily involved in both the relatively successful Battle of Messines and the carnage of the Third Battle of Ypres.

Credit:

Map produced by Geographx with research assistance from Damien Fenton and Caroline Lord. It originally appeared in Damien Fenton, New Zealand and the First World War (Penguin, Auckland, 2013)

It originally appeared in Damien Fenton, New Zealand and the First World War (Penguin, 2013)

BY-NC

Map showing the Western Front and major battles along it in 1916-17

Media file

NZEF in England 1916-19 map

$
0
0

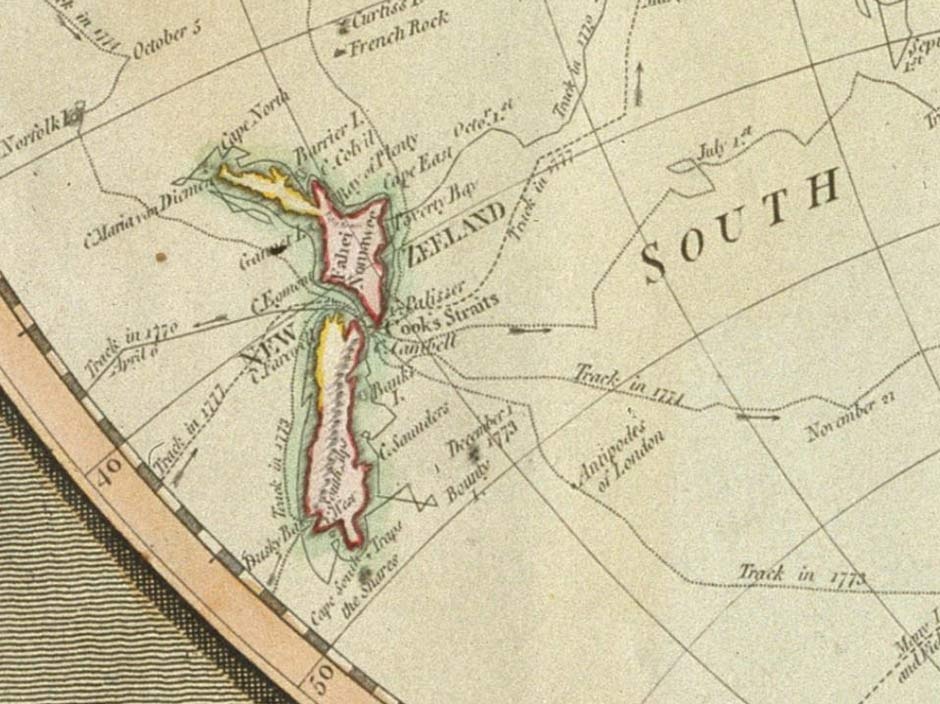
See enlarged version of this map here. You can also download a hi-res copy as a pdf (1.3 mbs).

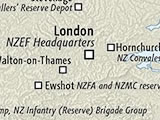
In order to support the New Zealand Expeditionary Force (NZEF) on the European continent, an enormous infrastructure of camps, hospitals, depots and offices was developed across the Channel, in England. Their locations are indicated by the white boxes on the map above.

The NZEF Headquarters in London dealt with records, public enquiries, postal matters, soldiers’ pay and legal issues.

Initially, Sling Camp on Salisbury Plain was the only training camp for New Zealand servicemen in England. This soon began to overflow, so secondary camps were established to accommodate other units: the New Zealand Rifle Brigade (NZRB) trained at Brocton; the New Zealand Machine Gun Corps (NZMGC) was based at Grantham; the artillery units (NZFA) and the Medical Corps (NZMC) both trained at Ewshot; the signallers were based at Stevenage; and the engineers, tunnellers and Māori reinforcements trained at Christchurch in Dorset.

New Zealand's sick and wounded soldiers were ferried from France to England on hospital ships. In the latter part of 1916 the NZEF set up a number of general hospitals to care for them: the first was at Brockenhurst, the second at Walton-on-Thames and the third, at Codford, looked after men from Sling Camp.

Complementing these general hospitals were convalescent hospitals, to which patients were sent to recover before returning to service. New Zealand soldiers recovering from wounds or diseases suffered at Gallipoli in 1915 were sent to the Anzac Convalescent Depot in Weymouth. From 1916, NZEF enlisted soldiers were sent to the large New Zealand Convalescent Hospital at Hornchurch, while two convalescent homes in Brighton were reserved for officers and nurses. Codford housed the New Zealand Command Depot, which provided rehabilitative training to soldiers not yet fit enough to return to their unit. Men deemed unfit for further service waited at the New Zealand Discharge Depot in Torquay for transport back to New Zealand.

Credit:

Map produced by Geographx with research assistance from Damien Fenton and Caroline Lord.

It originally appeared in Damien Fenton, New Zealand and the First World War (Penguin, Auckland, 2013).

BY-NC

Map showing the main New Zealand Expeditionary Force camps and areas of activity in England during the First World War

Media file

First World War in maps

$
0
0
Attached image: 
Media file
Viewing all 41 articles
Browse latest View live